


Magazine
How to make a nativity scene: complete guide from choosing figurines to scenery.
The nativity scene is the oldest representation of Italian Christmas – older than the tree, older than presents, older than any other Christmas tradition we know. It originated in the 13th century with Francis of Assisi in Greccio, arrived in Naples in the 18th century where it became a mass popular art, and from there spread throughout Italy bringing with it a culture of making, of building, of telling with the hands. This guide explains how to make a nativity scene-from choosing figurines to building the landscape, from lighting to actually running water.
Landi Moranduzzo crib – hand-painted marble resin, original models protected by the Ministry of Cultural Heritage
What you need to make a nativity scene: the complete list
Before buying anything, it is helpful to be clear about the three basic elements of any nativity scene, large or small: the figurines, the hut, and the scenery. Everything else-lighting, moving water, vegetation, village cottages-comes later, and is the difference between a basic nativity scene and one that tells a story.
- Nativity figurines (Holy Family + Three Kings + shepherds + animals)
- Scaled hut or cave with figurines
- Structural base (cardboard, plywood or wooden board)
- Natural cork for shaping rocks and reliefs
- Natural or synthetic moss for the soil
- Printed background for the sky and distant landscape
- Warm white LED lights for the hut and cottages
- Vinyl glue, hot glue, scissors, knife
How to choose crib figurines: measurements and materials

Landi Moranduzzo crib figurines – protected by the Ministry of Cultural Heritage as Italian artistic heritage
Choosing the size of the figurines is the most important decision. Everything else-the hut, the landscape, the village houses-must be built to scale with the figures you have chosen. Mixing figurines of very different sizes without criteria is the most common mistake made in building a nativity scene.
The rule is simple: the size of the main figurine (usually the Madonna or St. Joseph) determines the minimum interior height of the hut and the depth of the landscape. A 10 cm figurine wants a hut with at least 28-32 cm of interior height. A 6 cm figurine fits well in a 15-20 cm hut.
| Statuette size | Landi line name | Recommended hut | Nativity space | For those who are |
|---|---|---|---|---|
| 3.5 cm | Micro | h 10-15 cm | Countertop, 25×20 cm | Miniatures, collection, display cases |
| 6 cm | Mini SN | h 15-20 cm | Countertop, 40×30 cm | Shelves, sideboards, narrow spaces |
| 8 cm | Compact | h 20-28 cm | Large countertop, 55×45 cm | Those with limited space but want quality |
| 10 cm | Standard ⭐ | h 28-35 cm | Floor standing, 80×60 cm | The classic size of the Neapolitan nativity scene |
| 12 cm | Medium | h 35-45 cm | Floor-standing, 100×80 cm | Nativity scenes with developed landscape |
| 15-20 cm | Prestige | h 45-75 cm | Installation, 120×100 cm+ | Collectors, parishes, public spaces |
As for materials: marble resin (marble resin ) figurines have the weight and texture of limestone–they are hand-painted, each piece is unique, and they last for generations. Hand-painted PVC figurines have more uniform colors and are lighter – good choice for cribs that children touch. Screen-printed PVC figurines are the cheaper version, with the same sculpture but more standardized finishes.
The Landi Moranduzzo figurines are the only ones in Italy protected by the Ministry of Cultural Heritage as artistic heritage. In 2000 they received the blessing of Pope John Paul II by winning the international Caritas competition. They are the same ones that appeared in I Hate Christmas (Netflix, 2022-2023)-chosen by the set designers without commercial agreement because they recognized them as the authenticity of the Italian nativity scene.
How to choose the hut for the nativity scene

Moranduzzo crib hut with Landi nativity 6 cm – correct proportions for countertop cribs
The manger h ut is the visual focal point of the entire composition-it is the first element on which the eye falls, and it must have correct proportions in relation to the figurines. A hut that is too small crushes the figures; one that is too large loses them.
The rule of proportion: the inner height of the hut should be at least twice the height of the tallest figure (usually St. Joseph, who is typically the tallest figure in the Holy Family). For 10-cm figurines, St. Joseph measures about 11-12 cm with the staff: the hut should have at least 25-28 cm inside height.
The materials of the hut say a lot about the style of the nativity scene. Natural untreated wood with real straw is the most rustic and authentic-the classic choice for the Neapolitan nativity scene. Hand-painted resin with stone effects is more solid and lasts longer. Natural bark gives a woodland effect that goes well with nativity scenes with an Alpine or Nordic setting.
For those who want to place the crib outside–garden, porch, entrance–there are outdoor crib huts made of weatherproof materials with reinforced metal frames and UV-resistant resins.
How to build the crib landscape step by step
The landscape is what transforms a set of figurines into a narrative. It is built on three overlapping levels, from top to bottom:
Level 1 – The background (furthest away)
The crib backdrop is the first thing to be installed-it attaches vertically to the back of the structure before anything else. Moranduzzo backdrops are printed in high resolution on heavy anti-glare paper: night sky with comet star, sunrise over desert, Middle Eastern landscape. The choice of background determines the setting of the entire nativity scene.
The backdrop attaches with double-sided Velcro – allows it to be changed from year to year without ruining the structure.
Level 2 – The intermediate landscape
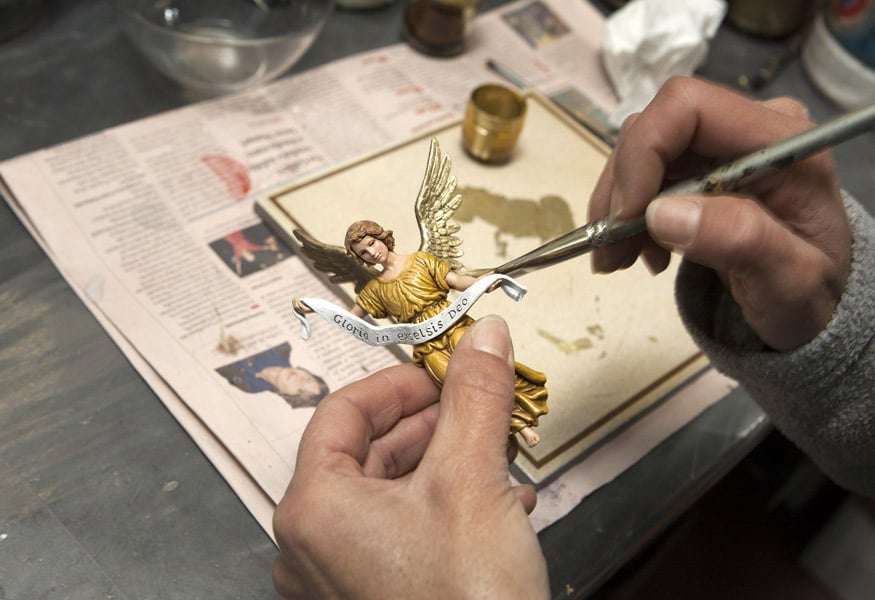
Handcrafted painting of Landi Moranduzzo figurines – each color is formulated in-house from a recipe book of 250+ coded hues
The middle plane is where the mountains, hills, rocks and village structures live. The reference material is the natural cork: lightweight, easy to cut, glueable with vinyl glue, and with a texture that–passed quickly with a low flame–becomes indistinguishable from real rock.
The basic technique for creating cork rocks: cut panels into the approximate shape desired with a serrated-edge knife, briefly pass a low flame over the surface (the heat opens the cork cells, creating the irregular texture of the stone), glue the pieces together with vinyl glue, cover with waste paper and thinned glue, then paint with acrylics in earth tones, ochre and gray.
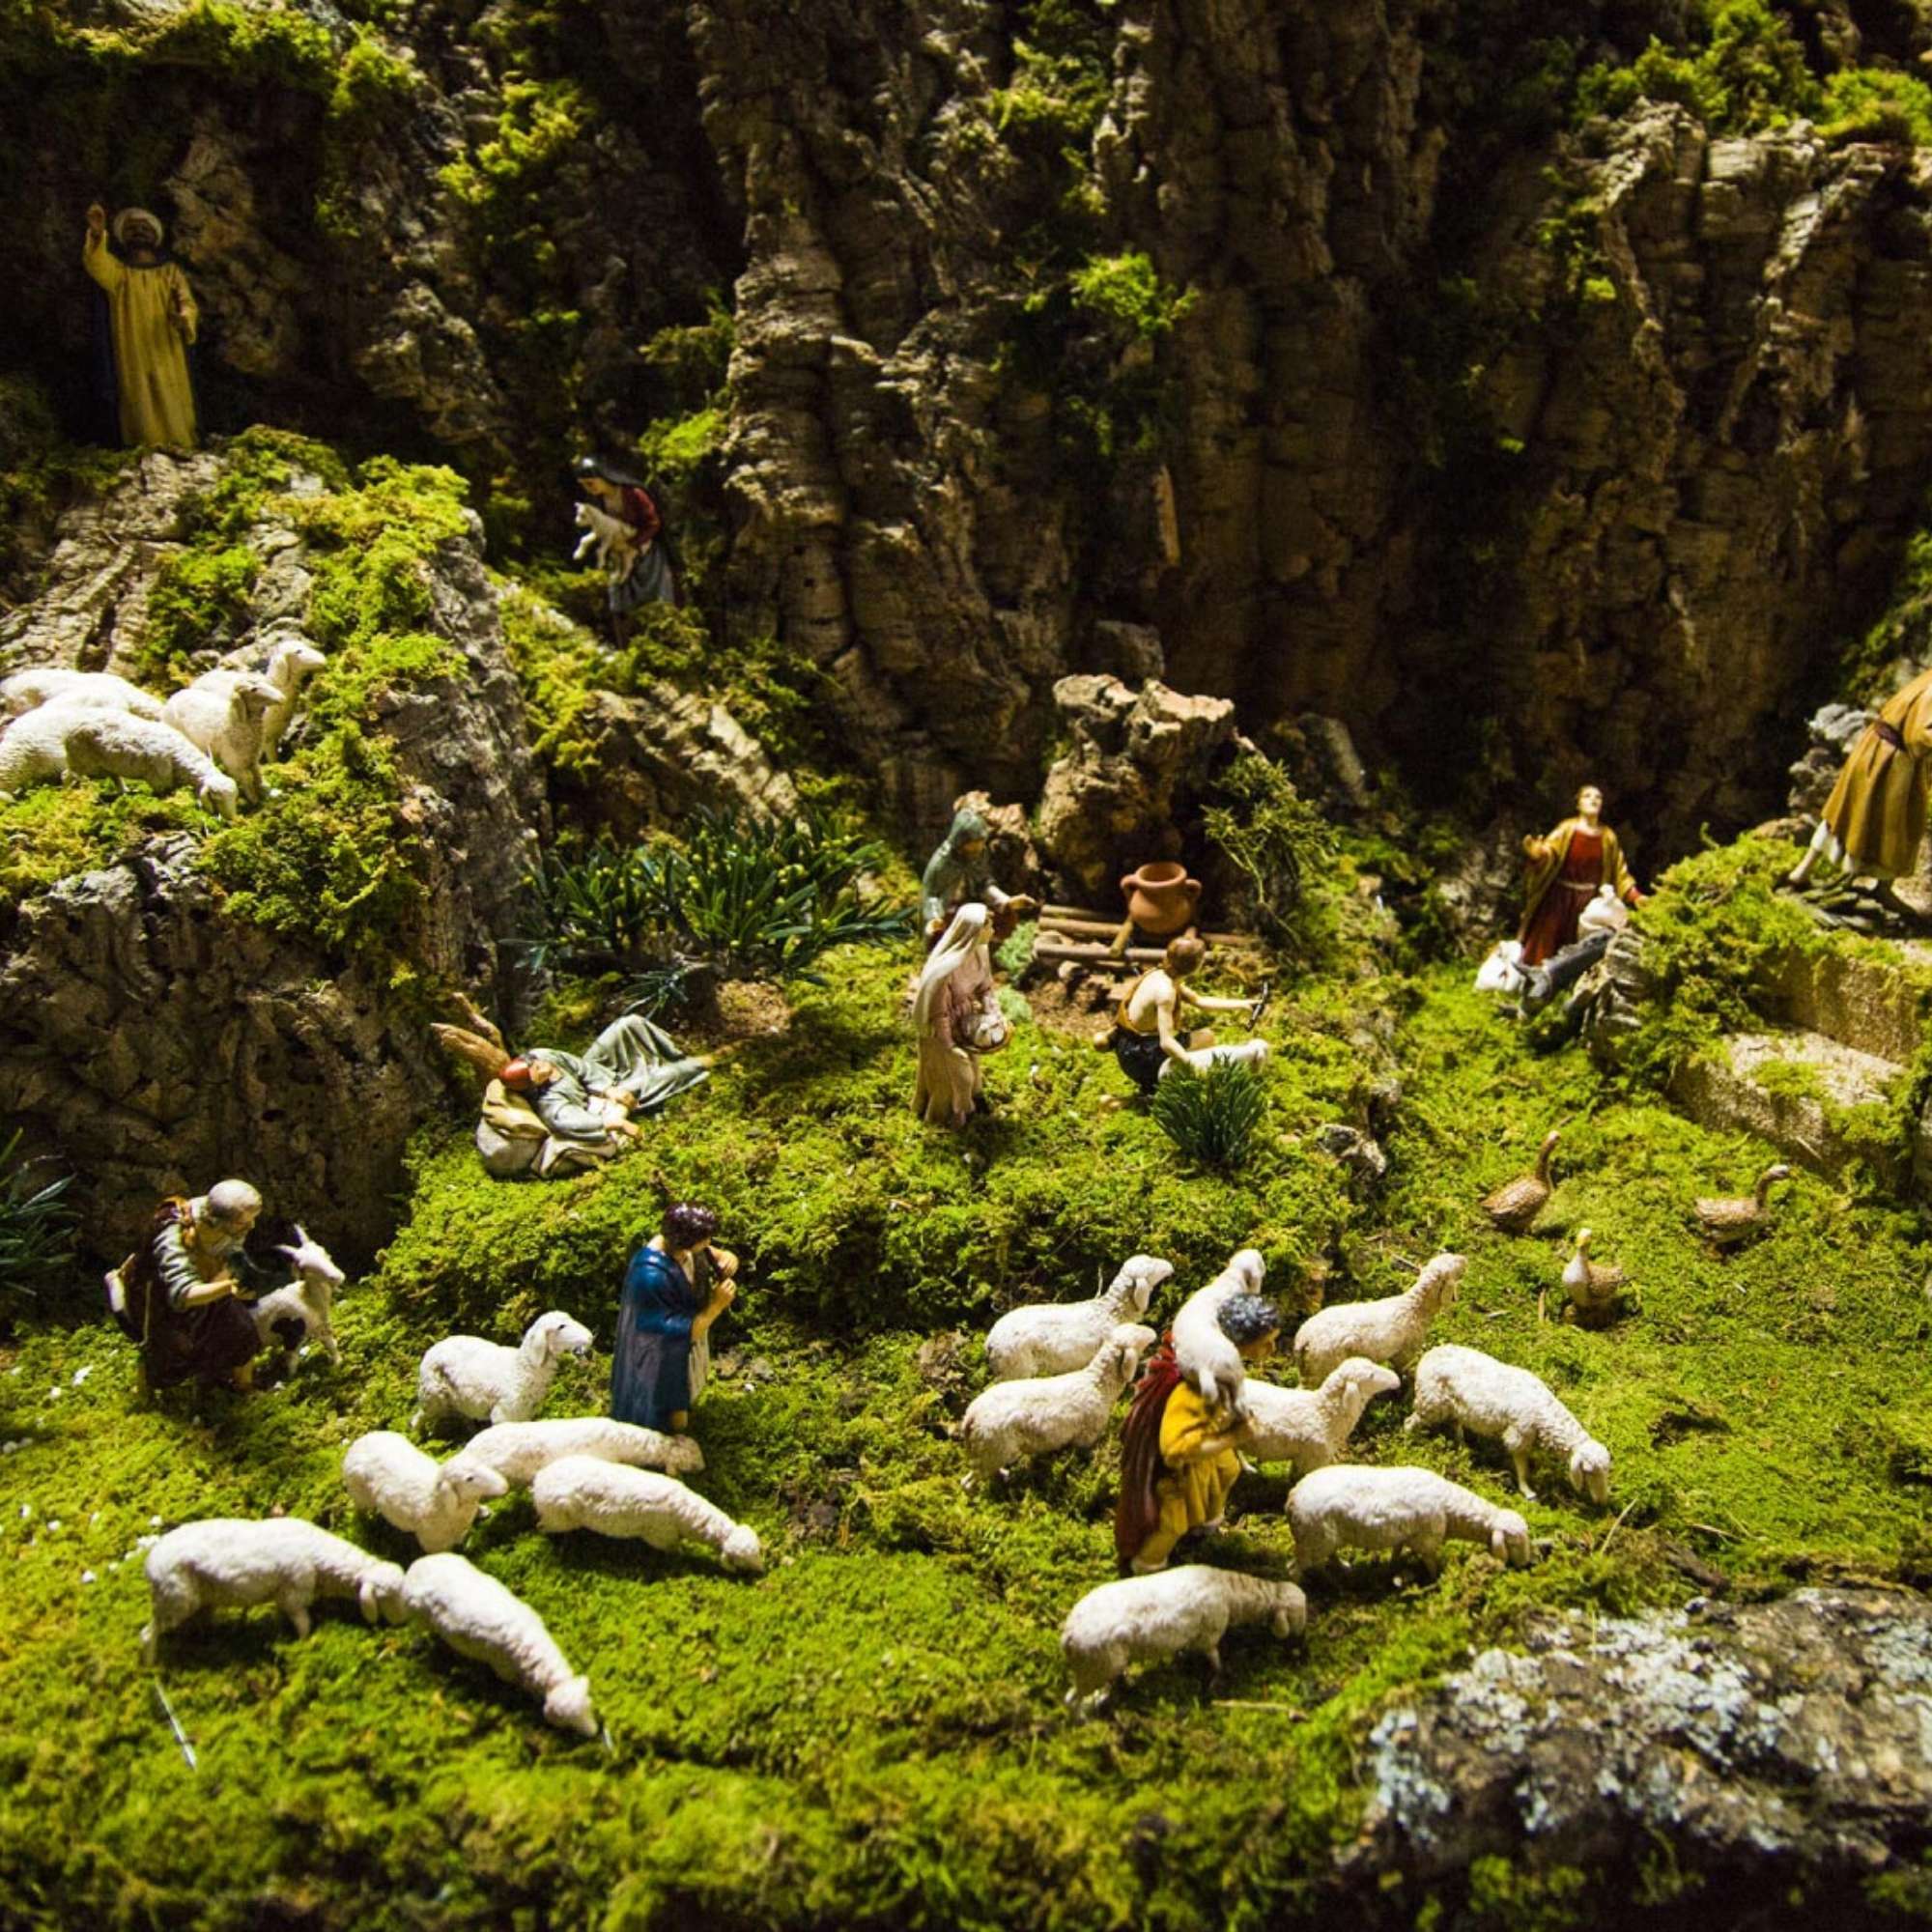
Level 3 – The foreground (the scenes)
The second floor is where the life of the nativity scene takes place. Here are the figurines, the hut, village houses, stores, and fountains. The ground finishing is done with natural moss applied with diluted vinyl glue, supplemented with sand for the paths, gravel for the stream banks, artificial grass for the fields.
How to light the crib
Rule of thumb: always use warm white LEDs (2700-3000K) for the hut and playhouses. The warm light replicates that of candles and creates the enveloping atmosphere of Christmas. Cold white (5000K) you use only for moon or snow effects. For blacksmith’s or baker’s fire, LEDs with a swinging flame effect are the most realistic available.
Le LED crib lights Moranduzzo have low surface temperatures-safe near straw, cork and moss. Battery-powered ones give maximum freedom of placement: no wires to hide, they turn on and off with a small switch. Powered lights are the right choice for huts with many light sources or for cribs that stay on many hours a day.
How to light a crib house from the inside: insert a 5mm warm white LED through a small hole drilled in the back. The battery is hidden behind the little house or under the crib top. The effect of illuminated cottage windows is among the most striking in the crib.
The nativity scene with real water: waterfalls, fountains and streams

The Landi Moranduzzo collection – hand-painted marble resin figures, available in sizes from 3.5 to 30 cm
The nativity scene waterfall with real water is one of the most scenic effects that can be achieved–the flowing water, the gentle sound of the stream, the reflection of the lights on the moving water completely transform the nativity scene experience.
It is made with a preformed resin structure (the waterfall or stream) connected to an electric crib pump that creates a closed hydraulic circuit. How it works: water starts from a waterproofed basin hidden under the structure, is pumped to the waterfall, flows along the path, and falls back into the basin. The system is quiet (less than 35 dB), low consumption, with adjustable flow rate.
The construction of the basin is the most important technical step: it is waterproofed with a sheet of gardening plastic (pond sheet) or with epoxy applied to the cork structure. The rest–pipes, fittings, pump–is included in the ready-to-use Moranduzzo kits.
The Neapolitan nativity scene: the Arab style and the classical style

Landi Moranduzzo figurines – Made in Italy, protection of the Ministry of Cultural Heritage, blessing of Pope John Paul II in 2000
Two great stylistic traditions coexist in the Landi Moranduzzo catalog: the Arab style and the classical Neapolitan style. They are not alternatives – they are two different ways of telling the same story.
The Arab style is a choice of historical fidelity: the Nativity took place in Bethlehem, a village in first-century Palestine. The Arab figures wear tunics, keffiyehs and sandals from the ancient Near East; the color palette plays on the earths, ochres and blues of the eastern sky. It is the style favored by collectors and international clientele-especially the French and Germans-who seek the geographical authenticity of the scene.
The classic Neapolitan style originated from the great aristocratic nativity scenes of 18th-century Naples: vivid polychrome clothing, scenes of southern village life, an everyday realism that documents 18th-century popular life as much as the Nativity of the first. It is the most recognizable tradition in Italy, the one that formed the collective imagination of the Italian nativity scene.
Both styles are compatible in the same nativity scene – indeed, the Neapolitan tradition has always mixed them. The Holy Family characters often have the Arabic style (more sacred, more austere), while the village characters have the classical style (more narrative, more lively).
When to put figures in the crib: the calendar
- Dec. 8 (Immaculate Conception): you start the nativity scene – you assemble the structure, the landscape, the empty hut. The hut remains empty.
- Dec. 9-23: Shepherds, village artisans, animals, cottages are added. The scene of daily life is gradually populated.
- The Three Kings: they enter on December 8 but position themselves far from the hut, to the east. They move a few inches each day, getting progressively closer.
- December 24, at midnight: the baby Jesus is placed in the manger. It is the most awaited moment, often experienced as a family ritual.
- January 6 (Epiphany): the Three Kings arrive in front of the hut. After Epiphany, the nativity scene is disassembled.
Where to place the figures in the nativity scene
- Baby Jesus: in the center of the hut, in the manger, on a bed of straw
- Mary: to the left of the Child (Neapolitan tradition), her head veiled, hands clasped or outstretched toward the Child
- St. Joseph: to the right of the Child, holding the wayfarer’s staff, in a protective position
- The ox: to the right of the manger, snout facing the Child
- The donkey: to the left of the manger, opposite the ox
- The shepherds: distributed around the hut and in the surrounding landscape, at different distances to create depth
- The angel: high above the hut or hanging on a branch
- The Three Kings: approaching from the east (right of the crib), at a progressive distance – arrive Jan. 6
Awarded to Matteo Moranduzzo on December 15, 2025 at Palazzo Valentini, Rome. The Landi Moranduzzo figurines are the only ones in Italy protected by the Ministry of Cultural Heritage as artistic heritage. ANDI, 10th edition.
How to make a complete nativity scene: summary for those starting out
1. Choose the size and purchase a complete nativity kit. A complete nativity scene with figurines and hut already to scale is the ideal starting point. Then you enrich it year by year.
2. Build the base. A plywood board or stiff cardboard with raised edges. For a 10-cm crib, the minimum base is 80×60 cm.
3. Install the backdrop. Attach the crib backdrop to the back with Velcro. Determine the setting for the entire landscape.
4. Build the rocks with cork. Glue crib cork panels to base, shape them with knife, flame them for rock texture, paint them with acrylics.
5. Apply ground finish. Natural moss with diluted vinyl glue, sand for paths, gravel for the banks of the creek if any.
6. Place the hut and structures. The hut in the center or slightly to the side. The village crib houses around, at different distances to create depth.
7. Install lights. Warm white LED chains inside the hut, single LEDs in the cottage windows, possible spotlight for the Holy Family.
8. Place the figurines. First the Holy Family in the hut, then the animals, then the shepherds in the landscape. The Three Kings start far away and get closer day by day.
Frequently asked questions – How to make the crib
Grandson of Dario Moranduzzo, founder of Italy’s first Christmas decoration factory (Florence, 1946). DocItaly International Award 2025 at Palazzo Valentini, Rome.